Physical Therapy Guide to Hip Impingement (Femoroacetabular Impingement)

Read Time: 6 minutes

What Is Hip Impingement?

Hip impingement, or femoroacetabular impingement, involves a change in the shape of the surface of the hip joint. It can lead to stiffness, pain, and damage of the tissue and/or bone. It most often occurs in young, active people. Conditions that cause hip impingement can be present at birth or develop over time. It affects men and women. Physical therapists help people with hip impingement regain movement, flexibility, and strength, and return to their regular activities and sport.

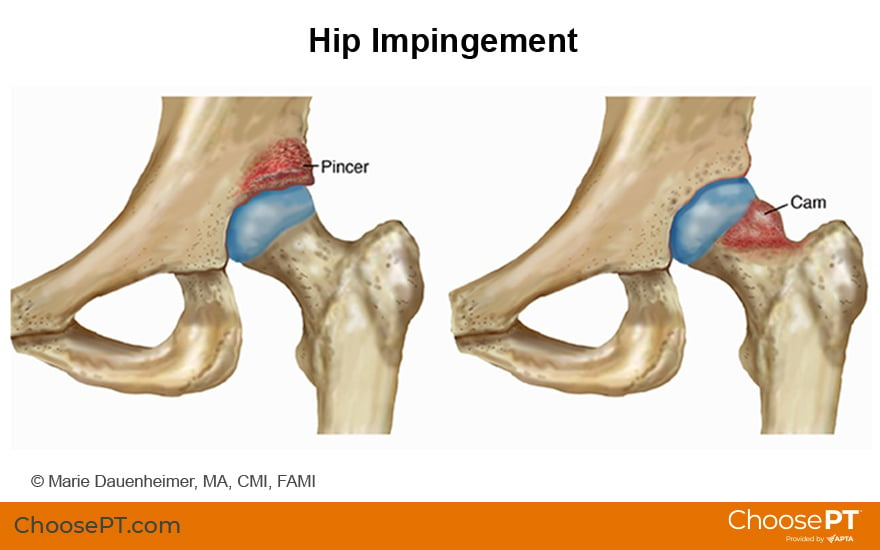
The two types of hip impingement, “pincer” and “cam,” may occur alone or together. Hip impingement usually affects people who are younger than 50. It may precede hip osteoarthritis.

Illustration of hip impingement

Pincer-Type Impingement

Pincer-type impingements affect men and women. This type may result when:

  • The hip socket, which is typically angled forward, angles toward the back.
  • Protruding bone develops on the pelvis. This makes the hip socket deeper so that it covers more of the ball or head of the femur bone.

Regardless of the cause, pincer-type impingements pinch the labrum, a rim of connective tissue around the edge of the hip socket. This pinching happens especially when flexing the hip (moving the leg up). Over time this extra pressure leads to wear and tear that can cause inflammation. Sometimes it causes a labrum tear. If this condition persists, the cartilage that lines the hip joint may become worn, form holes, and develop bone spurs.

Cam-Type Impingement

Cam-type impingements affect men more often than women and may result when:

  • The shape of the bone around the head of the femur (the ball at the top of the thigh bone) is misshaped. This deformity can be due to:
    • Variation of the “normal” shape of the head of the femur. This may be present at birth or can develop over time.
    • Bone that is overgrown at the top and front of the femur head. The nickname “pistol grip” deformity often describes this bony overgrowth on X-rays.
  • The overgrown or misshapen bone contacts the cartilage that lines the hip socket, possibly causing it to peel away from the bone in the socket. The labrum can become worn, frayed, or torn as well.

Signs and Symptoms

Hip impingement may cause you to experience:

  • Pain that begins gradually and may worsen with time. People with hip impingement often describe their pain by making a “C” with the thumb and hand and placing it on the fold at the front and side of the hip. This is called the “C” sign.
  • Groin pain or discomfort in the outside of the hip, thigh, low back, or buttocks.
  • Sharp, stabbing pain when squatting, sitting and standing, or performing athletic moves like running, “cutting,” jumping, twisting, pivoting, or moving side to side.
  • Loss of motion or a stiff feeling when rotating your leg inward and/or lifting your leg.
  • Pain that increases after sitting for long periods or leaning forward.

How Is It Diagnosed?

Your physical therapist will interview you to learn when and how your symptoms first began. They also will ask how your symptoms affect your daily life. They will discuss your goals for physical therapy and work with you on how best to achieve them.

Your physical therapist will perform an exam, which may include:

  • Watching you walk and noting any abnormalities.
  • Observing movements that are difficult, but not painful, for you to do (such as squatting).
  • Evaluating the range of motion (movement) of both hips, lower extremities (everything from your hips to your toes), and trunk.
  • Assessing the strength of both hips, lower extremities, and trunk.
  • Checking your balance and coordination for each lower extremity.
  • Testing the flexibility of each hip and other joints of the lower extremity.
  • Performing special tests to help determine whether the hip is the source of your symptoms. For instance, your physical therapist may gently roll your leg in and out (the “log roll” test), or bend your hip up and inward while turning the lower leg out to the side (the FADDIR test) to help determine the source of your condition.

For a firm diagnosis, your doctor may order tests to help identify any changes in the joint or labrum. These tests may include X-rays or an MRI. A diagnosis of hip impingement may take some time, especially if you also have low back, buttock, or pelvic pain.

Can a Physical Therapist Help?

Your physical therapist will conduct a thorough examination, including taking a detailed history, and may prescribe stretches and strengthening exercises to balance the muscles around your hip. They may use manual (hands-on) therapy to help restore your hip’s range of motion. Your physical therapist also may discuss making changes to your activities and lifestyle to help improve function and decrease your pain.

Without Surgery

Physical therapy may be beneficial for people with low-level hip pain and/or disability. Conservative care aims to:

  • Ease pain and discomfort.
  • Address individual limitations.
  • Improve overall function.

Your physical therapist may use some or all of the following approaches to help you achieve these goals. They may help you avoid the need for surgery or delay your condition getting worse. Your treatment may include:

Modifying your daily, job-related, and sports activities. Your physical therapist will recommend and discuss specific positions and activities for you to avoid or modify. These will be designed to protect your hip. They may recommend limiting how often you bend at the hip to avoid further hip damage. To minimize tension on the hip, your physical therapist will teach you safe, controlled movements.

Improving lower-extremity muscle flexibility and joint movement. Stretching tight muscles. Stretching the hip directly can reduce abnormal forces that cause pain with motion. Stretching other body regions (trunk, leg, ankle, or foot), also may decrease stress at the hip.

Joint mobilization. Your physical therapist may gently move your hip to help ease pain. This may improve your ability to stretch or extend your hip joint.

Improving the strength of your lower extremities and trunk. Strengthening the hips and trunk can reduce abnormal forces on the already injured joint. Your physical therapist will help you develop movement strategies to compensate for the injured hip joint.

Improving lower-extremity balance and coordination. Your physical therapist will prescribe exercises to help improve balance and coordinating movements. These can minimize forces and stress on the hip joint.

Home exercise program. Your physical therapist will design a specific home exercise program based on your needs and goals for you to do on your own. These will help you to stay strong and healthy safely, once your physical therapy visits have ended.

Functional training. Once your pain, strength, and motion improve, you will be able to slowly return to more demanding activities. Based on your unique needs and goals, your physical therapist will create a series of activities for you to do. They will help you learn how to use and move your body correctly and safely during your daily, work, and sports activities.

Following Surgery

Surgery for hip impingement is performed using arthroscopy. Arthroscopy is minimally invasive and only requires small incisions in the skin. The surgeon will insert pencil-sized instruments into the joint to repair the damage. The surgeon may perform one or more techniques during surgery as needed.

After surgery, physical therapy will depend on the type of procedure performed. On your first visit with a physical therapist, they will go over your history thoroughly and perform a physical exam (within the limits set by your surgeon). During later visits, your physical therapist may provide the following treatments:

Education. Your physical therapist will educate you about your condition.

  • Postsurgical wound care: You will learn how to watch for signs of infection and learn how to keep your wound clean.
  • Restrictions: Your physical therapist will go over any restrictions your surgeon has given you.
  • Brace: Your physical therapist will teach you how to put on and remove any brace prescribed by your surgeon, and explain the reasons for using the brace.

Gait training. Your physical therapist will teach you how to walk with an assistive device (such as crutches or a walker) if needed. They will teach you how to avoid putting too much weight on your hip as it heals.

Range-of-motion exercises. Initially, hip range-of-motion exercises will be gently performed for you by your physical therapist. As you heal, your physical therapist may teach you active range-of-motion exercises for you to do on your own.

Flexibility exercises. Your physical therapist may teach you stretching exercises for the entire lower extremity and your trunk.

Strengthening exercises. At the appropriate time, your physical therapist will teach you how to do the following types of strengthening exercises:

  • Isometric strengthening: tensing and relaxing your muscles.
  • Isotonic strengthening: tensing and moving your muscles (such as bending your knee).
  • Eccentric strengthening: tensing your muscles to move your hip joint safely.

Balance and coordination exercises. Your physical therapist will teach you how exercises to improve your balance and coordination.

Job- or activity-specific training. As you regain strength and movement, your physical therapist may add more specific exercises. Doing these will help prepare you to return to your work and sports activities.

Most people return to normal daily activities around three months after surgery. Returning to high-level activities and sports may take four to six months after surgery. Your physical therapist will recommend a gradual return to your regular activities based on your condition. Research shows that about 74% of athletes return to their prior playing ability after rehabilitation from this type of hip surgery. Each person is different. How long it takes to return to your desired activities will depend on the surgery performed and your sport.

Can This Injury or Condition Be Prevented?

Currently, there are no recommendations to prevent hip impingement. Despite a significant increase in research to learn more about this condition, there is a great deal that is unknown. For example, many active young people whose X-rays show abnormal hips do not have pain, despite active lives and playing sports.

However, evidence shows that physical therapy treatment, along with anti-inflammatory medicines, can:

  • Decrease pain.
  • Slow joint damage.
  • Improve function.

Physical therapy is very important for people who:

  • Have mild hip impingement.
  • Wish to avoid surgery.
  • Are not candidates for surgery.

What Kind of Physical Therapist Do I Need?

All physical therapists are prepared through education and experience to treat patients who have hip impingement. You may want to consider:

  • A physical therapist who is experienced in treating people with musculoskeletal problems. Some physical therapists have a practice with a sports or orthopedic focus.
  • A physical therapist who is a board-certified clinical specialist or who completed a residency or fellowship in sports or orthopedic physical therapy. This physical therapist has advanced knowledge, experience, and skills that may apply to your condition.
Our physical therapists are movement experts. They improve quality of life through hands-on care, patient education, and prescribed movement. You can contact us directly for an evaluation.
___________________________________________________________
source: choose pt

Osteopenia & What Women Over 50 Should Know

Osteopenia is a condition that begins in people who lose bone mass, and this results in weak bones. It is associated with low-calcium diets, smoking, age-related hormone changes, certain diseases, and medications. Women over 50 face higher risks of developing osteopenia and those diagnosed with the condition are at increased risk of developing osteoporosis, a serious medical condition that leads to bone fragility. It’s important to note that lifestyle changes may help slow bone loss and that beneficial treatments do exist. A special non-invasive X-ray test can measure the amount of calcium and other minerals in a segment of bone, typically the hips and spine, to diagnose bone health.

Symptoms of advanced osteopenia may include back pain, loss of height, a stooped posture, and easily fractured bones. However, these warning signs are usually only evident once the condition progresses. Osteopenia is detected via testing to include both a physical examination and a DEXA (dual-energy X-ray absorptiometry) imaging test. The DEXA test is painless and determines whether a person has healthy bones or osteopenia or osteoporosis. Patients are given a score called a T-score to indicate normal bone density, osteopenia, or osteoporosis. (The scoring is as follows: +1 to -1 = normal bone density, -1 to -2.5 = osteopenia -2.5 or lower = osteoporosis.) The test can also give healthcare providers a baseline measurement so that they can make future comparisons.

It’s important to be proactive when it comes to health. If you believe that you are at risk of osteopenia or osteoporosis, it’s vital to see a medical doctor to discuss testing and strategies to keep your bones healthy and strong. If a doctor concludes that you have osteopenia following testing, he or she may suggest some measures to keep bones healthy and prevent the onset of osteoporosis. This may include:

  • Taking calcium and vitamin D supplements together. Note that calcium is a natural mineral that plays a role in the body’s bone formation process. Vitamin D helps the body absorb calcium.
  • Eating a healthy and well-rounded diet full of nutritious fruits, vegetables, and calcium-rich foods.
  • Performing daily exercise to include some type of weight training. Note that numerous studies show that weight-bearing exercise can help to slow bone loss, and some conclude that it can even build bone.
  • Avoid unhealthy activities such as smoking. Also limit alcohol intake. Also, watch sugar intake as a diet high in sugar may drive both calcium and vitamin D deficiencies, per a study shared by Missouri Medicine.

Since people with low bone density are at increased risk of breaking bones, injury prevention is a critical step. Cleveland Clinic explains, “Falls are the leading cause of fractures in people with low bone density.” Thus, it’s vital to take personal safety measures to prevent falling. They suggest making sure homes have ample lighting, railings on stairs and in showers, and non-skid rugs. They also propose treating slippery surfaces indoors and out and removing tripping hazards from the home.

How Can a Physical Therapist Help?

A physical therapist working with an older adult

A physical therapist can help you prevent and treat low bone mass at any age. They will prescribe the specific amount and type of exercise that best builds and maintains strong bones.

Your physical therapist will review your health history, including your medical, family, medication, exercise, dietary, and hormonal history. They will also conduct a complete physical examination and identify your risk factors for low bone density.

It is important to exercise throughout life. It is especially important to exercise to maintain healthy bones if you have been diagnosed with low bone mass. Exercise can help to build bone or slow the loss of bone mass.

Your physical therapist is likely to prescribe exercise and physical activity to help prevent fractures and falls, and to reduce bone loss. Your treatment program may include:

Exercise focus

  • Posture guidance (spinal alignment and awareness for fracture prevention).
  • Balance training.
  • Leg strengthening.
  • Spine stretches.
  • Hip stretches.

Weight-bearing exercises

  • Dancing.
  • Tai chi.
  • Walking at a quick pace (122-160 steps per minute, or 2.6 steps per second).
  • Jumping, stomping, heel drops.
  • Running.
  • Racket sports.

Resistance exercises

  • Weightlifting.
  • Use of resistance bands.
  • Gravity-resistance exercises (such as pushups, stair climbing).

_______________________________________________________

sources:

amac.us/osteopenia-what-women-over-50-should-know

choosept.com/guide/physical-therapy-guide-osteopenia-low-bone-mass

The National Osteoporosis Foundation recommends people at average risk get a DEXA scan starting at 65 for women and 70 for men. The onset of symptoms, frequent bone fractures, and/or a family history of bone fractures or osteoporosis may also increase one’s risk for bone loss. This may necessitate a DEXA scan at a younger age. As always, it’s important to dialogue with your doctor regularly regarding all aspects of your health, including the all-important bones that support your body, allow you to move, and protect your brain, heart, and organs from harm.

Please note that this article is for general information purposes only and is not intended as medical advice.


Mosquitoes aren’t the only insects you need to worry about this summer. Ticks should be on your radar too.

If black-legged ticks—also known as deer ticks—are infected with a certain bacterium (Borrelia burgdorferi), their bite can transmit Lyme disease. Symptoms of Lyme include headache, fever, chills, fatigue, and muscle aches in the early stages.

But if left untreated, it can cause more serious neurological symptoms, like nerve pain or a form of temporary facial paralysis known as Bell’s palsy, says John Aucott, M.D., director of the Johns Hopkins Lyme Disease Clinical Research Center. In some cases, despite treatment, symptoms can last for months or even years.

It’s hard to say exactly how often these bites occur, but cases of Lyme are on the rise. In 2006, there were nearly 20,000 confirmed cases in the United States. By 2021, that number had grown to over 35,000, according to the Centers for Disease Control and Prevention (CDC).

But that’s just confirmed cases, meaning they were reported to the CDC by state health departments. Based on laboratory data and medical claims information, the CDC estimates that the actual number of people diagnosed with Lyme every year is probably much higher: around 476,000.

One reason for the upward trend: “There are ticks in more places now, especially black-legged ticks,” says Thomas Mather, Ph.D., director of the TickEncounter Resource Center at the University of Rhode Island.

tick

More than 35,000 confirmed cases of Lyme disease were reported in 2021, according to the CDC.

“Deer serve as the principle reproductive host for these black-legged ticks,” he explains. And as the deer habituate and stray more into populated areas, so do the ticks.

That means you may need to step up your game for tick prevention, especially during the high season for ticks, which generally runs from April to mid-November, Mather says. Here are eight things you need to know to steer clear of the little suckers.

1. Your Lyme Disease Risk Depends on Where You Live (and Travel)

Lyme disease was first discovered in Lyme, Connecticut, but you don’t need to be a New Englander to be at risk.

Lyme is most prevalent in the Northeast and Mid-Atlantic regions, as well as in some Midwest states. In fact, 95 percent of all confirmed Lyme cases in 2019 were in just 15 states: Connecticut, Delaware, Maine, Maryland, Minnesota, New Hampshire, New Jersey, New York, Ohio, Pennsylvania, Rhode Island, Vermont, Virginia, West Virginia, and Wisconsin.

But infected ticks can still be found in neighboring states, as well as in the South and on the West Coast. Ticks have different risk profiles in different areas, Mather explains.

For instance, about half the ticks in the Northeast, Mid-Atlantic, and upper Midwest states carry a germ that could make you sick, like Lyme. In the South, it’s more like one out of 20. And on the West Coast, it’s more like one out of 50 or one out of 100, he says.

2. Hikers Aren’t the Only Ones at Risk

There’s a misconception out there that you need to be an avid hiker or hunter to get a tick bite, Dr. Aucott says. But that’s just not true. While the tick risk is obvious in woodsy habitats, it can also be pretty high right in your own backyard.

Gardening is actually a common risk for being exposed,” he says. “We tend to see the risks in older people from gardening in their own yard.”

3. Early Lyme Disease Warning Signs Can Be Sneaky

In the early stages of Lyme, you’ll likely just feel lousy, like you would with a flu-like illness, and you may not see or recognize any rash, Dr. Aucott says. That’s why it can be difficult to finger Lyme as the potential cause, especially if you don’t remember getting a tick bite.

“Only about 30 percent of people who get Lyme recall a tick bite,” Dr. Aucott says. That’s because ticks are pros at remaining undetected so they can feast on your blood. A few things help them do that:

  • They’re small. In their nymph stages, ticks are the size of a poppy seed.
  • They tend to burrow in places you won’t see right away, like areas with skin folds—groin, armpit, or behind the knee.
  • Their bites don’t hurt. “They numb your skin when they bite so you don’t feel them,” Dr. Aucott says.

4. Not Everyone Gets a Bullseye Rash

Many people think a red-and-white bullseye rash—imagine the Target logo—is Lyme’s calling card, but you don’t need to have it to have Lyme, Dr. Aucott says.

“A stereotypical bullseye rash is only about 20 to 30 percent of the rashes,” he says.

The vast majority of people with Lyme—about 70 to 80 percent—will have some kind of rash. But they’re usually simply red, uniformly round or oval, and about two to three inches in diameter. These rashes often pop up in places you don’t normally look, and develop about seven to 10 days after an infected tick bites you.

5. A Blood Test Might Miss Lyme Disease

An experienced doctor who sees the Lyme rash can usually diagnose it on sight. But if you don’t have the rash, if the rash went away, or if the doctor just wants to confirm, he or she may order a blood test to check for Lyme antibodies called an enzyme immunoassay (EIA) test.

If the EIA is positive, a second test called a Western Blot will be performed to confirm the diagnosis.

The problem: Depending on when you get the blood test, it may not give you an accurate reading, Dr. Aucott says. “The blood test takes about three weeks to turn positive,” he says. “So if you are at the earliest stage of infection, the blood tests may still be negative.”

If your doctor is suspicious of Lyme but your initial test comes back negative, they may recommend you take a retest in three to four weeks. After a confirmed diagnosis, the typical treatment for Lyme is a two- or three-week course of an antibiotic called doxycycline.

6. You Can Prevent a Tick Bite

As always, the best way to protect yourself is to play the preventive game.

“Stay out of places ticks are looking to bite you,” Dr. Aucott says. That means stay on the trail if you’re outdoors. Don’t wander off into the brush or the high grass—both environments ticks like.

Tucking pants into your socks can help keep ticks out, but that’s not always feasible during the hottest days of summer.

Another option: Wear clothing treated with permethrin, a chemical that incapacitates or even kills ticks but is safe for humans, Mather says. Look for clothes treated on the inside and the outside.

You should also look for a 0.5 percent permethrin spray to treat your shoes before going outside. The treatment typically lasts about one month.

If you have pets, note that permethrin is not harmful to dogs—but may be harmful to cats and fish. The TickEncounter Resource Center advises letting permethrin-treated clothing dry completely before going near cats. Learn more about permethrin here, and see tips to protect your pets from ticks here.

7. Adopt the Toilet-Time Tick Check

Even if you’re taking preventive measures, you should still perform a tick check each day to make sure one didn’t latch on, Mather says. The “lean over and look” strategy can be harder as you get older, and because nymph-stage ticks are so small, they can easily be overlooked if you don’t have an up-close view.

Try the toilet-time check instead: Each day when you sit on the toilet, make it a time to check for ticks too, Mather says. This gives you a close look at the areas ticks often hide: the inside of your legs, your genital area, and below your belly button.

8. If You Find a Tick, Remove It Fast

A tick typically has to stay attached to you for 36 to 48 hours before it can transmit its Lyme-causing bacterium. So if you’re able to remove the tick within 24 hours or so, you likely won’t have had the chance of Lyme infection, Mather says.

For fast and safe tick removal, use fine-tipped or pointed tweezers, which will allow you to reach in from the side and grab the head of the tick, not the back. Then you can pull the tick firmly upward and off your skin.

“The germs are in the back part of the tick, so when you only grab the head, you have a better chance of not squeezing germs into you,” Mather says.

Dispose of the tick by flushing it down a toilet or placing it in a sealed bag before tossing in the trash. Clean the bite with rubbing alcohol or soap and water.

What not to do: Strike a match to burn off a tick. You not only risk burning your skin, but black-legged ticks have long mouthparts and lock themselves into your skin when they bite, Mather says. So the match trick won’t cause them to back out.

LASTLY: How Can Physical Therapy Help

There are several potential treatments for Lyme disease through Physical Therapy. They are usually focused on the secondary symptoms and work in concert with the medical management of the condition. A Physical Therapy program may include:

·Manual Therapy includes massages, stretching and joint mobilization to improve alignment, mobility and range of motions, and to alleviate the pain of affected joints.

·Exercise Programs to help stretch and strengthen muscles to help assist weakened surrounding joints.

·Mechanical Modalities include ultrasounds, electrical stimulations, laser, ice and heat to decrease pain and inflammation.

·Gait and Balance Training as well as other forms of training to help improve movement techniques and reduce stress on joints caused by daily activities


_____________________________________________________________

SOURCES:

silversneakers.com/blog/lyme-disease-what-older-adults-should-know/

fitness-forum.com/single-post/2018/06/05/lyme-disease-and-physical-therapy

Returning to Activity After a Pandemic

Restrictions are lessening more and more and people are looking to get active and enjoy the warm weather. That’s all good news, but if you had a long break from activity because of the pandemic or otherwise, your body might not be ready to jump right back in. Here are a few tips to help you get more active without getting hurt:

Start slow
– If you’re a runner, think about a walk-to-run program
– If you’re a weight lifter, start with lighter weights and fewer reps.
– Whatever your activity of choice is, start with short periods of activity and gradually work your way back up.

Warm-up and cool down
Warming up gets your heart and lungs ramped up and prepares your muscles and tendons for the increase in activity about to come. Include some light cardio like jogging, calisthenics, or cycling, followed by active stretching like butt kicks, high knees, or yoga.

Cooling down transitions your body back to a lower state of stress – it brings your heart rate and breathing down, decreases blood flow to your muscles and back to places like your digestive system, and helps you relax. It’s also a great place for static stretches if you need some work on your flexibility.

Take a day off
Rest days let your body recover and keep you from getting burned out. Not enough exercise isn’t good for you, but too much of a good thing can cause problems too.

Watch for early signs of injury
Some soreness for a few days after activity is normal, especially if you’ve had a long break. But there are a few common issues to watch out for as you return to activity:

– Swelling or bruising
– Joint pain, especially in the knees or shoulders
– Foot pain, which could be a sign of plantar fasciitis
– Muscle strains – particularly common in the hamstrings
– Sprains – most common in the ankle

Any of these issues justifies a call to our physical therapists!

Getting checked out early can prevent an injury that derails your attempt to return to activity. Our PTs see all of the issues just mentioned on a regular basis and can help safely guide you back into a more active lifestyle.

5 Signs of Overtraining That Trainers Say Mean It’s Time To Take a Day Off

“Overtraining occurs when you exceed your body’s ability to recover from strenuous exercise,” says trainer Ken Rawlins, trainer and founder of the SCULPT fitness app. ” It happens when you don’t give your body enough time to rest and repair. This can cause your performance to significantly decline in and out of the gym.” Read on to find out why pushing your body past its limits is not a good idea, plus the signs of overtraining that are worth cueing into.

Why overtraining is a bad thing

In simplest terms, overtraining means that you’re working out too hard, too often, and too long without giving your body the rest it needs to recover. “Overtraining is a physiological state caused by an imbalance of the amount you’re working out compared to the amount of rest,” says trainer Kathy Smith. “It can almost feel like a ‘workout hangover,’ and can include symptoms such as lack of energy and motivation.”

When you work out, tiny micro-tears occur in your muscles, and it’s the recovery of those micro-tears that ultimately helps you get stronger. When you don’t give muscles proper time to repair, it can lead to issues. “Rest and recovery is very important to improve your strength and stamina, because it allows your body to repair damaged tissue,” says Rawlins. “Without adequate rest and recovery, this can backfire and decrease your athletic performance. Proper conditioning requires a balance between overload and recovery. Overtraining during your workout routine is a bad idea to eliminate fatigue and exhaustion.”

Whether you’re a fitness beginner or a professional athlete, it can be easy to fall into the trap of pushing your body past its threshold. “It is common that athletes, who train for a specific event or competition, tend to exercise beyond their body’s ability to recover—continuous training can surprisingly weaken the strongest athletes—but you don’t have to be training excessively to suffer the effects of overtraining,” says Rawlins. For exercise newbies, overtraining tends to happen when you try to do too much, too soon. “One of the biggest mistakes for beginners is that after months or years without training, they try to make up for lost time,” says Juliet Kaska, a celebrity trainer and Vionic Innovation Lab expert. “In an attempt to get results quickly, they pack everything into their first two weeks. This can set the stage for overuse injuries, and delay progress. It can lead to prolonged fatigue, unusual muscle soreness, and decreased performance.”

Signs of overtraining

1. Lack of improved performance

If you’re working out nonstop and finding that you aren’t getting any stronger, overtraining could be to blame. “The tell-tale sign of overtraining is lack of improved performance, despite your work ethic or training intensity,” says Rawlins. “Decreased strength, agility, and endurance are all common signs of overtraining, and this can make effortless workouts feel unusually difficult.” So if you’re used to powering through 10 push-ups, no problem, and are suddenly unable to do a single one in perfect form, take it as a sign that it’s time for a day off.

2. Aches and pains

“One of the first signs that you’ve overtrained includes muscle soreness, including a feeling of ‘heaviness’ in your body, even when you’re doing light activities,” says Smith. This is different than your usual second-day soreness, in that it sticks around and makes it more challenging than usual to move through your everyday life. These aches and pains also make it more difficult to do your workouts properly, which puts you at a heightened risk of injury. “I’m all for discipline and follow-through, but when you’re barely making it through your workout, or your form continues to slide, your body is telling you to slow down,” says Kaska.

3. Mood swings

Exercise is known to trigger a spike of cortisol—aka the stress hormone—in your body, and when you don’t allow time for your cortisol to level out, it can have an impact on your mood. “Overtraining can significantly affect your stress hormones and sex drive that will cause mood swings and irritability,” says Rawlins. You may feel anxious, depressed, and unable to focus. Taking a day off, or at the very least treating your body to a lower-impact, cortisol-conscious workout, can help restore balance.

4. Elevated blood pressure and resting heart rate

While moderate exercise is celebrated for its ability to lower your resting heart rate, getting too much of it can backfire on this front. According to a 2016 study,  one of the side-effects of overtraining is an elevation in both your blood pressure and resting heart rate. A “normal” resting heart rate can fall anywhere between 60 and 100 beats per minute, so it’s important to stay in tune with what “normal” looks like for you and be aware of any changes.

5. Changes in energy and sleep patterns

Overtraining comes with the catch-22 of making you feel more exhausted than usual while also making it harder to sleep. Per a 2018 study, sleep quality and quantity declined as a result of an increased training load, and “poor sleep is a common complaint among overreached and/or overtrained athletes.”

How to prevent overtraining

1. REST

The most important thing you can do to prevent these signs of overtraining is (say it with me now) rest and recover. “When we place this stress on the body, especially with higher intensity exercise, we create physical damage of small tears in the muscle fiber, and periodic rest is important so that the body can heal these tears–that’s when we gain our strength,” says Kaska. “Healing happens during recovery or rest periods.” Of course, “rest” doesn’t have to mean lying on the couch and doing nothing (though it certainly can!). If you want to keep moving on your dedicated rest days, choose a lower-impact activity, like a light walk or a stretch class.

2. Set attainable goals

Instead of following along with the trendiest new Instagram workout—which may or may not work for your body—set attainable goals that work for you. “Develop a training program that works for you and your current level of fitness,” says Kaska. “Set goals that progressively increase with time. If you’re not a runner, it isn’t realistic to aim for running ten miles a day…by next week. But slowly adding minutes to your run over the course of a month is much more measurable, and safer, too.”

3. Listen to your body

It may sound simple, but if your body is telling you to take a day off, listen to it. “If you’re weak or sore, give your body time to rest and recover,” says Rawlins, and Kaska and Smith wholeheartedly agree.

What to do if you’ve overtrained

1. Sleep

In addition to taking your usual rest and recovery days (which, by now, you know are just as important as your workouts),  if your body is showing signs of overtraining it’s extra important to focus on getting enough sleep. “Sleep, a lot!” says Rawlins. “Sleep doesn’t only give your muscles rest, it will balance your hormones.

2. Lighten up your load

When you are ready to go back to the gym after overtraining, you’ll want to take a “slow and steady wins the race”-style approach. “Decrease the number of sets and reps, the length of time you train and reduce your level of intensity,” says Rawlins. This will help you avoid ending up back in the same cycle of pushing too hard.

3. Take a look at what you’re eating

Diet and exercise go hand-in-hand, and it’s important to give your body the fuel it needs to get through your workouts. “Identify nutrition deficiencies in your diet,” suggests Rawlins. “Refueling the body with a mixture of proteins and carbohydrates should be a priority, immediately after each workout.”

source: https://www.wellandgood.com/signs-overtraining/

How to Stick to Your Home Exercise Program

If you’ve been to physical therapy, you likely got a home exercise program. Research says that if you do your home exercise program, you’ll have a significantly better chance of meeting your goals and feeling better. Not doing your program increases the risk of recurrent injury or flare-ups with less positive outcomes long term. Even though they’re important, adherence to home exercise programs is terrible. It’s estimated that only 40 to 50% of patients do their exercises the way they’re supposed to. What can you do to make sure you do your exercises and get the best outcomes? Here are a few ideas.

Plan ahead

Think about what’s going to get in your way – your schedule, that you’ll forget, or that you don’t have the space or equipment that you need. Once you figure out the problems, come up with solutions. Put your exercises in your schedule, talk to your PT about equipment, or adjusting your program to fit the time you have. If you solve problems before they start, they’re no longer problems.

Address pain and beliefs

You’ll need to work with your PT on these. If your exercises cause pain, you’re not going to do them. When your PT prescribes your exercises, try them out. If there’s pain, ask your PT about modifications to make them more comfortable. The other thing might need addressed are your beliefs. If you believe that the exercises won’t help, or that they’re a waste of time, you won’t do them. Again, work with your PT to understand why they’re prescribing those exercises, and what they’re meant to do. Once you know why you’re doing those exercises, you’re more likely to do them.

Get support

People who have a buddy or social system are more likely to do their exercises. This is why group exercise classes work. Find a family member or friend to help you stay consistent with your exercises. Your PT can help here too. Have someone ask if you’re doing your exercises, and how they’re going. This will keep you accountable and more likely to do them.

Use Technology

If you like technology and gadgets, they can help you be consistent with your exercises. There are plenty of apps that can track your exercise. Seeing that streak of days you’ve exercised will motivate you not to break it. Smartwatches and activity trackers can fill the same role.

Doing your home exercise program will help you get the most out of PT. With a little planning and a little help, you can make sure you’re one of the 50% of the people who do their home exercises consistently to get the best outcomes.

References:

https://pubmed.ncbi.nlm.nih.gov/32669487/

https://www.physio-pedia.com/Adherence_to_Home_Exercise_Program

If You Like a Good Bargain, You’re Going to LOVE Physical Therapy

It’s no secret that prices have been going up. Gas is expensive. Food is expensive. The housing market is crazy. If you’re looking for ways to pinch some pennies or stretch your dollars, physical therapy might be just what you’re looking for.

Physical Therapy Saves Cost

A study that looked at the claims data of 472,000 Medicare beneficiaries with back pain found that when PT was the first treatment, costs were 19% lower than when people got injections first and 75% lower than for people who were sent straight to surgery. The study also found that in the year following diagnosis, people who got PT first had costs 18% lower than those who got injections, and 54% lower than those in the surgery group.

Another example happened in 2006 when Virginia Mason Health Center in Seattle teamed up with Aetna and Starbucks. They sent workers with back pain to see both a physical therapist and physician for their first treatment. Use of MRI dropped by 1/3, people got better faster, missed less work, and were more satisfied with their care. The cost savings were so great that Virgina Mason was losing money on treating back pain, so Aetna ended up paying them more for PT treatments because they were saving so much money.

Physical Therapy First Means Fewer Visits…

A paper published in Physical Therapy looked at outcomes when patients went to a PT first vs. seeing a physician first for back pain. It found that patients who went to their physician first needed 33 PT visits on average, while those who went to their PT first only needed 20. Seeing a PT first saves money, but it also saves time.

It Also Means Better Outcomes

A study of 150,000 insurance claims published in Health Services Research, found that those who saw a physical therapist at the first point of care had an 89 percent lower probability of receiving an opioid prescription, a 28 percent lower probability of having advanced imaging services, and a 15 percent lower probability of an emergency department visit.

High-quality research consistently shows that taking advantage of direct access and getting to your physical therapist quickly leads to better outcomes in fewer visits with lower costs. We think that’s a deal worth taking advantage of.


References
  1. https://ww1.prweb.com/prfiles/2010/11/03/4743604/0_ANovelPlanHelpsHospitalWeanItselfOffOfPriceyTests.pdf
  2. https://pubmed.ncbi.nlm.nih.gov/33245117/
  3. https://www.apta.org/news/2017/07/26/study-says-cost-savings-of-physical-therapy-for-lbp-are-significant#:~:text=Researchers%20say%20that%20not%20only,over%20treatments%20that%20begin%20with
  4. https://academic.oup.com/ptj/article/77/1/10/2633027?login=true
  5. https://newsroom.uw.edu/news/early-physical-therapy-benefits-low-back-pain-patients

Why Isn’t Postpartum Physical Therapy Standard Practice? It Should Be

Now imagine you are told all this pain, leakage, and weakness is a “normal” part of your postpartum journey. It can be isolating and scary, and leave you with more questions than answers.

Most women (and men!) hardly know what their pelvic floor does, let alone feel comfortable talking about it. But it is a vital part of our function, supporting our bowels, bladder, and sexual activity. And it is especially crucial during the “fourth trimester” immediately following childbirth, which is where the system often fails new moms.

This is when physical therapy can have a strong impact — during a time of healing, hormonal shifts, and altered body mechanics when new mothers might be particularly vulnerable. Pelvic health physical therapy during that fourth trimester can empower them with the skills they need to feel confident and protected. Physical therapists can offer guidance on when to return to therapy should their problems persist. We can give them the same care and support they had during their pregnancy.

Our goal has been to have a more open conversation surrounding pelvic health, to destigmatize the topic, and empower women on their postpartum journey.

In our own journey to help healing mothers, we facilitated a program at our hospital to see new moms during their inpatient postpartum stay. After all, most patients who have had simple abdominal surgery automatically are referred for physical therapy; why not new moms? Postpartum care is not just important, it is crucial.

Typically, new moms stay between two to three days postpartum, and we see them the day or two after delivery. We are pelvic floor physical therapists who work in an outpatient center attached to the hospital, so we are able to bounce back and forth easily. In our current program, we have two-to-three hours reserved during different times of the week to see these patients. Most often we see patients who had cesarean deliveries, experienced more severe perineal tears, or who have given birth to multiples.

We start by chart reviewing all new mothers, with attention to medical history and their birth notes to see if there was any trauma or labor complications. When we first started the program, we next would call the resident obstetrician for verbal orders to see our patients. After a few months of building a good rapport with the physicians and registered nurses, we have been fortunate enough to receive standing orders for our patients, only calling the obstetrics team with complex patients. As any inpatient physical therapist knows, the nurses are invaluable. We talk to them prior to seeing patients, gathering important information about the patient’s pain and activity levels, and gaining some insight into their healing journey since delivery.

Our sessions differ a little bit from traditional mobility inpatient physical therapy. We go in expecting to talk to them about their bowels, bladder, and body mechanics since most are ambulating independently. For our subjective examination, we ask about past deliveries and current pain levels. We also discuss voiding and bowel movements, asking about issues such as straining, pain, and incomplete emptying. Our mothers who have had a cesarean delivery, in particular, listen up at this and tell us if they have been worried about having a bowel movement or if doing so has been painful.

For the objective exam, we perform a general movement assessment, including bed mobility, transfers, standing activities, and gait. Adding the pelvic floor to that, we look at quality of breathing, transverse abdominis recruitment, and pelvic floor muscle recruitment.

Patients often are used to using accessory muscles to breathe during pregnancy, because the organs shift in the abdomen as the baby grows, causing the diaphragm to compromise on its own movement pattern. To address this, we start teaching them gentle diaphragmatic breathing. We talk to them about the importance of managing pain, cramps, and scar tissue as well as helping them to void and have a bowel movement without straining. In some cases, new moms have difficulty voiding after delivery, and addressing diaphragmatic breathing and toileting posture has helped those patients avoid having to use a catheter.

These discussions lead into the topic of intra-abdominal pressure, and we have found that some patients tend to perform the Valsalva maneuver with movement. In most cases, we can easily manage the increased pain that comes with holding their breath and “bracing” during movement by using breathing techniques. We discuss exhaling and contracting the pelvic floor or transverse abdominis (as long as it is pain-free) with functional mobility. Teaching them to breathe more effectively and efficiently has been beneficial to their pain management.

Along the same lines, we also discuss the benefits of abdominal binders to support healing in the abdomen and help with diastasis. We teach them how to don and doff the device, and how and when to wear it. We remind our patients that abdominal binders are not “waist trainers” or shapewear meant to help them “get their figure back,” as those would interfere with the breathing exercises we’ve taught them, impede their core strength recovery, and could even cause harm.

Does this seem like information overload for someone already overwhelmed by new motherhood? We give all patients a postpartum packet that discusses everything we have taught them. The packet also contains information on body mechanics for holding and carrying a baby, indications that they should follow up in outpatient physical therapy for pelvic health, and the clinic phone number if they have questions. Patients get a lot of information during their stay, and our hope is that having it all written out will give them better retention and confidence when they return home.

In the time we have been doing this program, we have had some growing pains, but we are constantly changing to meet the needs of this patient population. We are incredibly proud of the service we are providing to these postpartum mothers, we appreciate the support of the obstetrics team, and we hope this will become a more common practice in all hospitals.

____________________________________________

source: apta

Date: Monday, May 9, 2022
Perspective Authors: Jessica Enge, PT, DPT, and Elizabeth Farmer, PT, DPT

Physical Therapy Guide to Diastasis Rectus Abdominis

Diastasis rectus abdominis is a separation of the left and right sides of the outermost abdominal (stomach) muscle. It is caused by forces that stretch the connective tissue called the linea alba. This condition most often occurs in pregnancy, but also may occur in infants, older women, and men. Physical therapists help adults with DRA manage their symptoms, improve their strength and stamina, and safely return to their regular activities. DRA is fairly common in infancy. For babies with DRA care and monitoring is provided by a pediatrician.


What Is Diastasis Rectus Abdominis?

The most common cause of DRA is pregnancy. As the fetus grows, the uterus expands and increases pressure against the stomach wall. This pressure causes the connective tissue to widen, increasing space between the right and left sides of the muscle. It may be noticed during or after pregnancy. Typically, DRA develops during the second or third trimester when the fetus grows most rapidly. DRA often resolves on its own during the first three months after the birth (postpartum). Other potential causes for DRA include:

  • Frequent or rapid changes in weight.
  • Stomach obesity.
  • Genetics.
  • Poor training technique or overloading the stomach wall during heavy lifting activities.

Infants commonly are born with a DRA that resolves over time without treatment. Pediatric doctors may monitor infants for the development of an umbilical hernia.

Several factors may make a person more prone to developing DRA. These include age, being pregnant with multiple children, and having had many pregnancies. The stomach muscles have many important functions within the body. These muscles aid in postural support, movement, breathing, and protection of the internal organs. For some people, a DRA may:

  • Persist after pregnancy.
  • Change the appearance of the stomach muscles.
  • Result in reduced muscle strength.

For someone juggling the normal stresses of a new baby, discomfort, weakness, and changes to postural control, the added muscle weakness from a DRA may impact quality of life.

How Does It Feel?

Separated stomach muscles are usually painless and often have no symptoms. Some people, however, report problems that may be related to DRA that can include:

  • Appearance.
  • Discomfort.
  • Difficulty doing certain activities.

A person with DRA may experience any of the following symptoms:

  • A separation of the rectus abdominis muscle that is visible and felt by touching the stomach.
  • Feelings of “flabbiness” in the stomach muscles.
  • Low back, pelvic, or hip pain.
  • Poor trunk posture.
  • Feeling weak through the midsection.
  • Doming or tenting of the middle of the stomach. This can occur during activities such as lifting, rolling over in bed, or certain exercises.

How Is It Diagnosed?

Your physical therapist will review your medical history and conduct a thorough interview. For women, this may include specific questions about:

  • Pregnancies.
  • Labor and delivery history.
  • Type of delivery (cesarean or vaginal).
  • Pain.
  • Activities that make your symptoms better or worse.
  • History of abdominal organ illness or surgeries.
  • Types and level of physical demands at work, home, and sport.

Your physical therapist also will ask you when your symptoms began and how they impact your daily life.

They will gently feel your stomach muscle (palpate) to find if it has separated. Your physical therapist also will assess factors that can influence your strength, mobility, and endurance. These factors can include your:

  • Posture.
  • Breathing.
  • Flexibility.
  • Overall muscle strength.
  • Movement patterns during certain activities.

How Can a Physical Therapist Help?

Physical therapy is a very effective way to manage the symptoms of DRA. It can improve your strength and stamina so you can return to normal activities. Your physical therapist may help you with:

Education. Your physical therapist can identify which movements or activities to modify or avoid as you recover. They will help you safely progress your activities as you heal. Your physical therapist will teach you safe and effective ways to regain your full function, so you can return to the activities that you enjoy.

Postural training. Learning to engage the deep core muscles through posture and breathing is one of the most important parts of treatment for people with DRA. This involves posture training and breathing to activate your deep core muscles as a unit. Postural training will focus on the:

  • Transverse abdominis muscles.
  • Diaphragm.
  • Low back muscles.
  • Pelvic floor muscles.

Your physical therapist will show you ways to do daily activities, such as lifting and carrying a baby or other objects. These methods will help to strengthen and reduce pressure on your stomach muscles

Exercise training. There are four layers of stomach muscles, and all are important in DRA rehabilitation. These muscles are the:

  • Transverse abdominis.
  • Internal and external obliques.
  • Rectus abdominis.

A physical therapist can teach you the right type and intensity of exercises for your condition and goals. They can help you progress through them as you get stronger. Your physical therapist can address muscle imbalances. They also can show you stretches and diaphragm releases to help restore normal breathing patterns.

Bracing. Taping or braces for the abdominal region can provide support for some women with DRA during pregnancy. Your physical therapist also may recommend the use of support in the early phases of recovery. Support garments put the abdominal muscles in a more normal position. The tape or brace may remind you to safely use your core muscles during activities that increase pressure on the stomach. A brace or tape does not make your muscles weaker. Physical therapists treating pregnant women can make sure a support brace or garment is right for use during pregnancy.

Electrical muscle stimulation. This treatment may be used by a physical therapist to reduce DRA. It is used after pregnancy and in other adult populations. Electrical muscle stimulation gently activates the rectus abdominis muscle. It has been shown to improve function and reduce the amount of separation.

Can This Injury or Condition Be Prevented?

DRA is a natural consequence of pregnancy. In most cases it resolves on its own and does not impair function. Studies show that starting a program to stabilize the core and pelvic-floor muscles in early pregnancy is highly effective. It can improve function and help you manage the pressure that may worsen a DRA during and after pregnancy. A physical therapist can help women learn safe and effective exercise strategies to improve their:

  • Pregnancy.
  • Labor.
  • Delivery.
  • Experience after giving birth.

Physical therapy strategies to manage abdominal pressure during work activities and a personalized program of safe, progressive exercise also are effective for men and women with non-pregnancy-related DRA. If you develop DRA, the earlier you see a physical therapist, the faster you will be able to return to the activities you enjoy.


source: www.choosept.com


Constipation Blues: Abdominal Massage for Constipation


by: Kennan Wyne, PT, DPT
Women’s Health Specialist

Constipation is obviously uncomfortable, but did you know it can lead to health issues like fecal impaction, colon cancer, digestive problems, and pelvic floor issues.

Constipation occurs when the colon absorbs too much water, or when the colon’s muscle contraction is slow or sluggish delaying transit time. The result is a hard and dry stool, which can lead to straining and the inability to release your movement with ease. So, trying to avoid the pain and discomfort caused by constipation should be high on your prevention checklist.

The colon is oriented in your abdomen in an upside-down “U” shape, as shown in the picture below. Performing massage to the abdominal area is an effective and easy way to help relieve constipation, and is safe to perform daily!

To begin, I recommend applying 10 minutes of heat to your abdomen (optional) before massaging your abdomen. Then start massaging 10 times in each direction with firm pressure.

I. Start in the center of abdomen at your navel and perform small circular motion in clockwise direction (10 circles total).

II. Next, place hands at right hip bone and perform 10 small circles in clockwise direction then move up working towards the right ribs. Spend more time massaging areas of blockage, tightness, hardness, pain, cramping, or tenderness.

III. Next, when you reach the right ribs perform 10 small circles in clockwise direction then move across working towards the left ribs.

IV. Last, when you reach left ribs perform 10 small circles in clockwise direction then move down working towards left hip.

Perform these techniques 1-2x daily as needed.